Step 1 - Register Online
All the new users who want to file e return needs to register first and get the user Id and Password.The following must be known to complete the First Step of Registering:
1.PAN Number: Format for PAN Number is AAAAA1234A.
2.Name: First Name, Middle Name (If Applicable), Last Name.
3.The Date of Birth (in case of an individual) or the Date of Incorporation. The format for the date is DD eg. 01 or 23 etc.; MM for month, eg. 01 for January; and YYYY for Year, for eg. 1986.
After furnishing the above details, the site will itself take you to the step 2 of Members Registration.

These details will be used to create the profile of the user. Those fields which are * are mandatory.
Step 2- Login: The user must login to the Portal using the credential information furnished at the time of Registration. The two fields required which are Username and Password. This combination will be unique to the user and is tied to the user's PAN.
For Security purposes, it is advised that the password must contain a minimum of six characters which are alphanumeric.
Step 3 - Select Menu:
The Downloads link from the Left Navigation menu will open the page containing Downloads specifically for the selected Form. The Downloads link at the Top Navigation menu will lead to the consolidated Downloads for all the Forms, as well as other small applications which may help in e-Filing of Returns.
Step 4: Download:
The Downloads page allows the Logged in User to download various utilities that the Income Tax Department offers to the Tax Payers. Click on the hyper-link associated with any of the downloads to begin the processing of downloading. These downloads may be saved and installed locally to facilitate the offline processing of e-Returns.

Click on the hyper-link associated with any of the downloads to begin the processing of downloading. These downloads may be saved and installed locally to facilitate the offline processing of e-Returns.
The website offers Free Client Side Utilities which can be used to facilitate creation of the e-Return XML File. Any one of these may be used as per the user convenience. The formats offered are:
.exe (WindowsApplication)
.pdf Adobe Form
.xls (Microsoft Excel)
Option: Windows Application

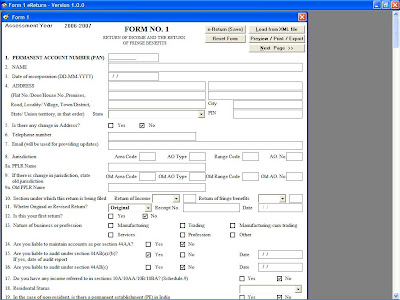
This is a sample snapshot from the Windows ApplicationThis application allows entering data, save partially, export to print, and generate XMLIt has a pre-requisite software which must be installed on your computer. This pre-requisite software is also available free from the e-Filing web site. If this pre-requisite is installed once, it supports all the Windows Application based forms (Form 1,2, 2F, 3, and 3B). It is not required to be installed separately for each of the forms.
Option: PDF Adobe Form 
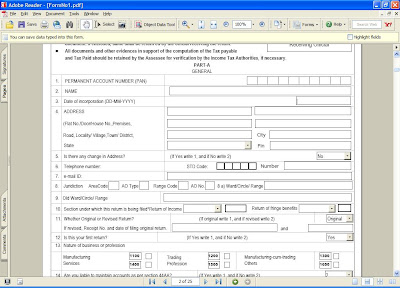
This is a sample snapshot from the Adobe FormThis application allows entering data, save, print, and generate XMLIts pre-requisite is Adobe Acrobat Reader Version 7.0.5 which must be installed on the computer.Currently, Form 1 and Form 3B are available in this format.
Option: Microsoft Excel 
The Microsoft Excel version of the Form allows entering the data required to be filled in.Allows saving and export to XML. It has a Three Step Process:
Validates the input
Generates a file called an SRF File (.srf extension)
Has a separate File Validation Utility which accepts the .srf as input and generates the XML file as the output.
Step 5 - XML Generation and Validation:- Either of the applications listed earlier, or other applications based on the Income Tax Department’s XML Schema can be used to generate the output XML File.
- This XML file will be around 100 KB in size
- It will have a .xml extension
- After validating the contents, you can upload this XML file to the e-Filing server.
- Please remember where you are storing the .xml file containing the e-Returns.
Step 6 - Upload XML:
Using the Internet, access the website and login, unless already logged in. Select the link to go to the correct Form using the Left Navigation Bar. Click on Submit Your Returns. The above utility will be seen. Click on "Browse", and select the complete path to the .xml file stored earlier.
Sign this certificate after selecting a certificate, using the correct password. This password will be the one which is associated with your Digital Signature.
Step 7 - Digitally Sign the Upload (Optional):The "Sign Selected File" Button appears on the lower right corner. In case you wish to use the Digital Certificate to upload, you will need to Click on this button to invoke the dialog box seeking the path to the Digital Certificate.
Click on "Browse" to select the Digital Certificate path.
Sign this certificate after selecting a certificate, using the correct password. This password will be the one which is associated with your Digital Signature.
Step 8 - Receive Acknowledgement: The XML File which is uploaded is passed through a series of Server Side Validations to confirm that the critical items are correctly inserted. If this is so, you will see a message informing you of a successful Return upload, and a unique Acknowledgement Number will be generated. This is to be printed by you and kept as a reference. In case you used the optional Digital Signature, this is your Acknowledgement Number. In case you did not utilize the Digital Signature option, this will be your Provisional Acknowledgement Number. In this case, you will still need to manually file your returns, quoting this Provisional Acknowledgement Number.
Supporting Tax Payers
Web Query through e-mails: Provision is being made to allow registered users to seek replies to queries via e-mail. For this reason, a valid e-mail in the user profile is a must.
Help Module on Homepage: Help Modules are available on the Homepage itself, and are being regularly updated.
FAQs: Frequently Asked Questions are a set of questions that the end user typically may seek answers to. A set of these are available at the web site, and are also being regularly updated.
Benefits To Tax Payers Anywhere/ Anytime Filing
No Personnel Interface
Quick Processing
Direct Credits of Refund
Return Tracking
Permanent Records
Labels: FINANCE
 You can get more out of your Hard Disk (SATA or PATA) by enabling write caching on the disk by default write caching is enable on the windows to improve performance and you have to enable it manually on the hard disk.
 You can get more out of your Hard Disk (SATA or PATA) by enabling write caching on the disk by default write caching is enable on the windows to improve performance and you have to enable it manually on the hard disk.


 After using


 Click on the hyper-link associated with any of the downloads to begin the processing of downloading. These downloads may be saved and installed locally to facilitate the offline processing of e-Returns.
 This is a sample snapshot from the Windows ApplicationThis application allows entering data, save partially, export to print, and generate XMLIt has a pre-requisite software which must be installed on your computer. This pre-requisite software is also available free from the e-Filing web site. If this pre-requisite is installed once, it supports all the Windows Application based forms (Form 1,2, 2F, 3, and 3B). It is not required to be installed separately for each of the forms.
 This is a sample snapshot from the Adobe FormThis application allows entering data, save, print, and generate XMLIts pre-requisite is Adobe Acrobat Reader Version 7.0.5 which must be installed on the computer.Currently, Form 1 and Form 3B are available in this format.


